How to Build a Simple GraphQl Server in NodeJs


When it comes to building APIs, REST has been the most popular API Architectural Style for a couple of years now. As a common thing with technology there will be something new and even better as we advance, and today we have GraphQl.
According to the official documentation:
GraphQL is a query language for APIs and a runtime for fulfilling those queries with your existing data.
In this article, you will learn about the basics of GraphQL and how to build a simple GraphQL server in nodeJS.
Basics of GraphQl
Here are the basic things you need to know about GraphQl
- In GraphQl every request falls under the categories, a query (read) and mutation (write). This can be likened to the POST and GET methods of RESTful APIs.
- Every operation is either a POST or GET request. And most cases POST is used a lot.
- Almost all status codes are 200 irrespective of a success or failure response with few exceptions of 400 or 500 sometimes.
- Every request is a GraphQl operation which is a simple string that a GraphQL server can parse and respond to with data in a specific format.
- All oprations are defined in the schema with their fields and data types. Operations can be likened to endpoints for REST APIs.
- GraphQL comes with a set of default types known as scalar types. They are Int, Float, String, Boolean and ID. There are other types too. Go here to learn more about types: Schema and Types
We are going to be using ExpressJs and Apollo to make the setup easier. Apollo makes it easy to implement GraphQl, this includes both the client and server side. Since we are working with express then we make use of apollo-server-express built upon apollo-server, Apollo for server-side.
Setting up the server
To begin, create a new project folder called "graphql-server" with the following command:
mkdir graphql-server
Navigate to the folder and initialize your nodejs program with the command:
npm init
After following through the steps of initializing your project and the package.json file created, next is to install the following dependencies:
npm install express apollo-server-express graphql --save
We are going to be writing the code in ES6 and because of this we shall install babel to transpile the code to ES5 to enable Nodejs understand it. To install babel run the command below:
npm install @babel/core @babel/node @babel/preset-env --save-dev
In your root folder create a .babelrc file with the following command:
touch .babelrc
add this configuration as the content
{
  "presets": [
    "@babel/preset-env"
  ]
}
Now we're about to write the code. Create a folder src the root directory, in the src folder create the entry file index.js and add this as the content:
import express from 'express';
import { ApolloServer } from 'apollo-server-express';
import http from 'http';

const app = express();
const httpServer = http.createServer(app);

const server = new ApolloServer();

const port = process.env.PORT || 4000;

const start = async () => {
    await server.start();
    server.applyMiddleware({ app, path: '/graphql' });
    await new Promise(resolve => httpServer.listen({ port: 4000 }, resolve));
    console.log(`Server ready at http://localhost:${port}${server.graphqlPath}`);
};

start();
The code isn't complete yet and needs resolver(s) and schema(s).
Schema: A schema describes the shape of your available data, defines its fields and types, and specifies exactly which queries and mutations are available for clients to execute. Resolver: A resolver is a function that's responsible for populating the data for a single field in your schema.
Next you have to provide the schema(s) and resolver(s). Create two folders in named resolvers and schemas in the src folder. In resolvers folder create a file index.js and add this code as the content:
const db = [{ id: 1, name: 'Ugo'}]; // in memory data store
const resolvers = {
  Query: {
    getMe: () => {
      return db[0];
    },
    getUser: (parents, args) => {
      const { id } = args
      if (id <= 0 || id > db.length) throw new Error('User Not found.');
      else {
          const i = id - 1;
          return db[i];
      }
    },
  },
  Mutation: {
    createUser: (parent, args) => {
      const count = db.length;
      const id =  count + 1;
      let { name } = args;
      if (!name) name = 'no name';
      const newUser = { id, name };
      db.push(newUser);
      return newUser;
    },
  }
};
export default resolvers;
Go to the schemas folder, create an index.js file and add the following code to it:
import { gql } from 'apollo-server-express';

const schema = gql`
  type Query {
    getMe: User
    getUser(id: ID!): User
  }

  extend type Mutation {
    createUser(
      name: String!
    ): User!
  }

  type User {
    id: ID!
    name: String!
  }
`;
export default schema;
Import the schema and resolver into the entry file and your code should look like this:
import express from 'express';
import { ApolloServer } from 'apollo-server-express';
import http from 'http';
import schemas from './schemas';
import resolvers from './resolvers';

const app = express();
const httpServer = http.createServer(app);

const server = new ApolloServer({
  typeDefs: schemas,
  resolvers,
});

const port = process.env.PORT || 4000;

const starter = async () => {
    await server.start();
    server.applyMiddleware({ app, path: '/graphql' });
    await new Promise(resolve => httpServer.listen({ port: 4000 }, resolve));
    console.log(`Server ready at http://localhost:${port}${server.graphqlPath}`);
};

starter();
It has been passed into the AppolloServer.
Before you test the server go to your package.json file, to where you have the key scripts, add a start command:
"start": "babel-node src/index.js",
Running the Server
Open cmd, change to the project folder, and run:
npm start
Awesome! A round off applause, you've gotten your graphql server started and you should see this text printed on your console:
Server ready at http://localhost:4000/graphql
Okay lets start sending requests to the newly built server and for simplicity sake I will be using postman. Actually there are other ways to test a graphql server:
- GraphQl Playground. You can use it by visiting http://localhost:4000/graphql on your browser after starting ther server and also connected to the internet.
It is enabled by Apollo Server and works only when your
NODE_ENVis set todevelopment.
Open postman, set the url to localhost:4000/graphql and select action POST. Remember all graphql requests are POST request.
First, we are going to perform a query, next a mutation and lastly another query.
Select body, select GraphQl then paste this under QUERY:
query {
  getUser(id: 1) {
    id, name
  }
}
Send the request, it will get you the first User from the array that serves as the database. The result will be
{
    "data": {
        "getUser": {
            "id": "1",
            "name": "Ugo"
        }
    }
}

Next you test the getMe query like so
query {
  getMe {
    id, name
  }
}
which will always return the first User
{
    "data": {
        "getMe": {
            "id": "1",
            "name": "Ugo"
        }
    }
}

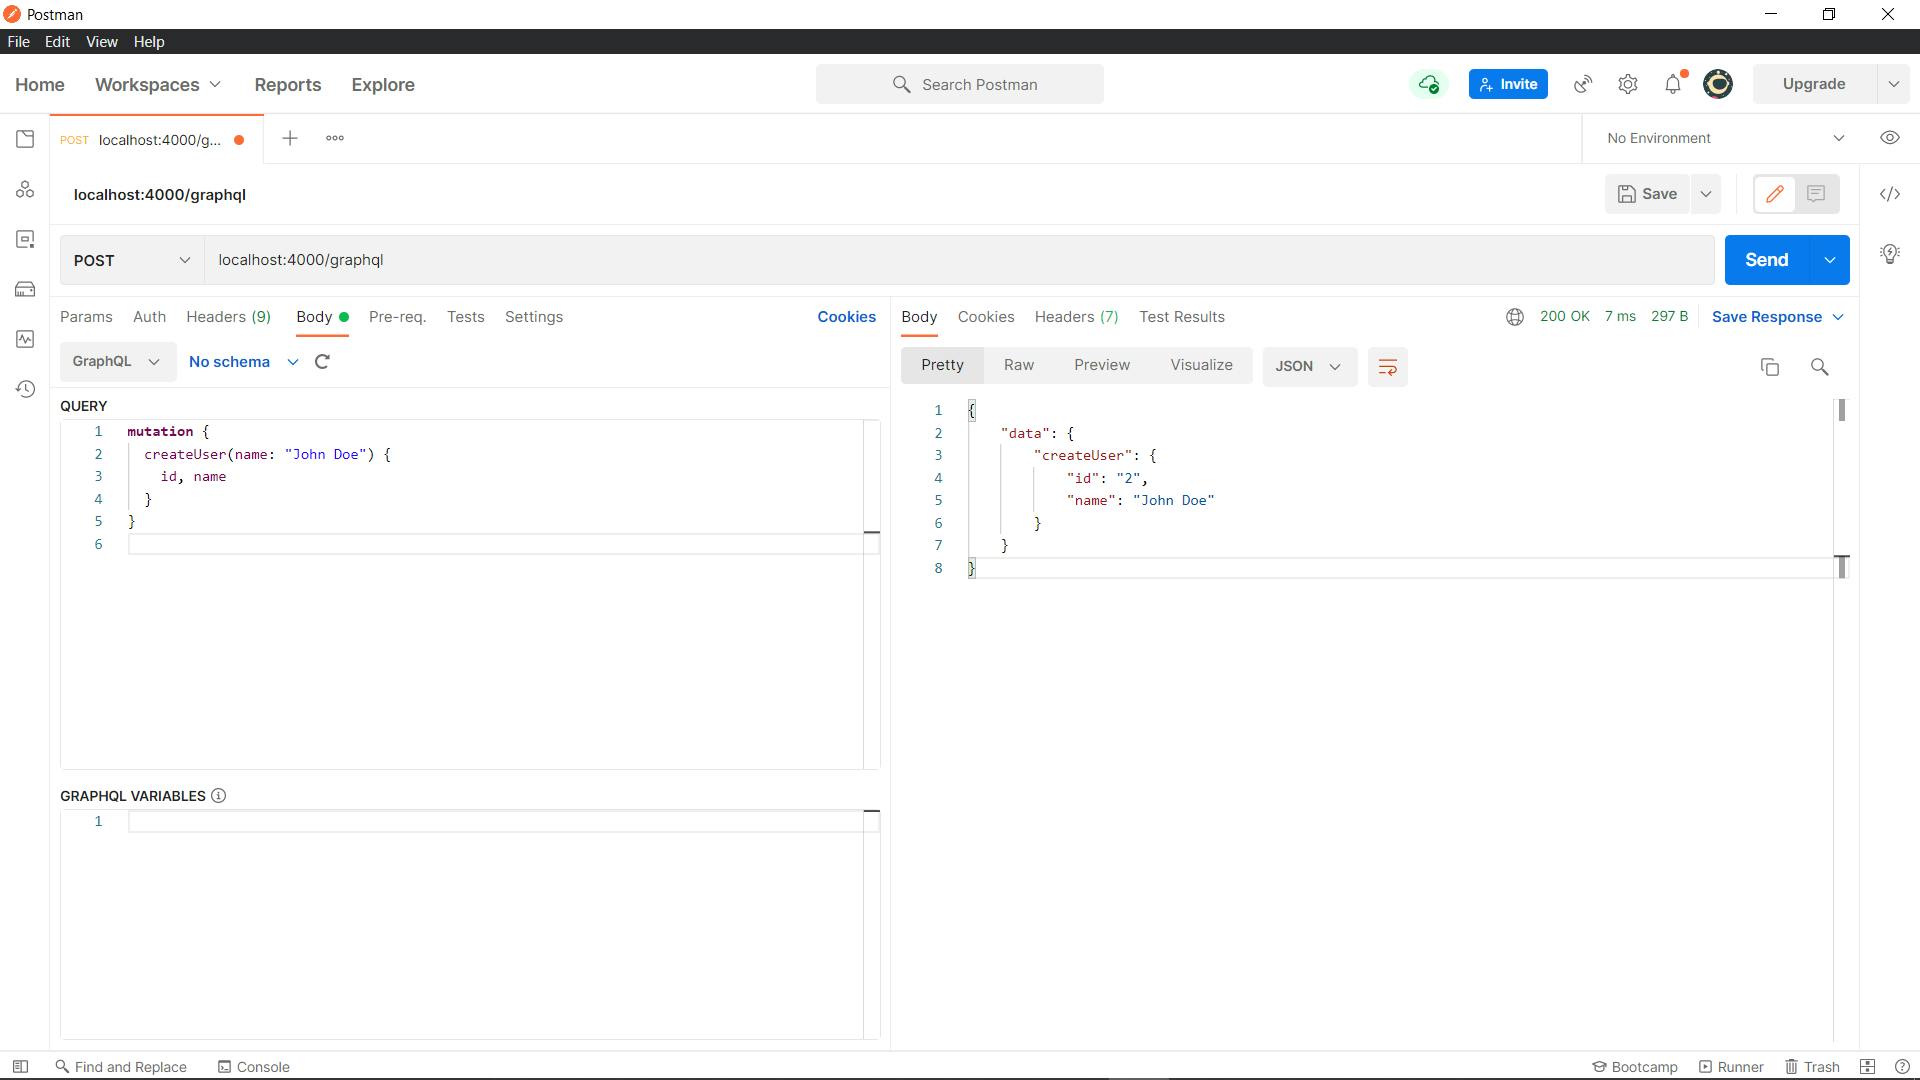
Lets perform a mutation by creating a new user. In your post send this
mutation {
  createUser(name: "John Doe") {
    id, name
  }
}
and the response gives us a new User
{
    "data": {
        "createUser": {
            "id": "2",
            "name": "John Doe"
        }
    }
}
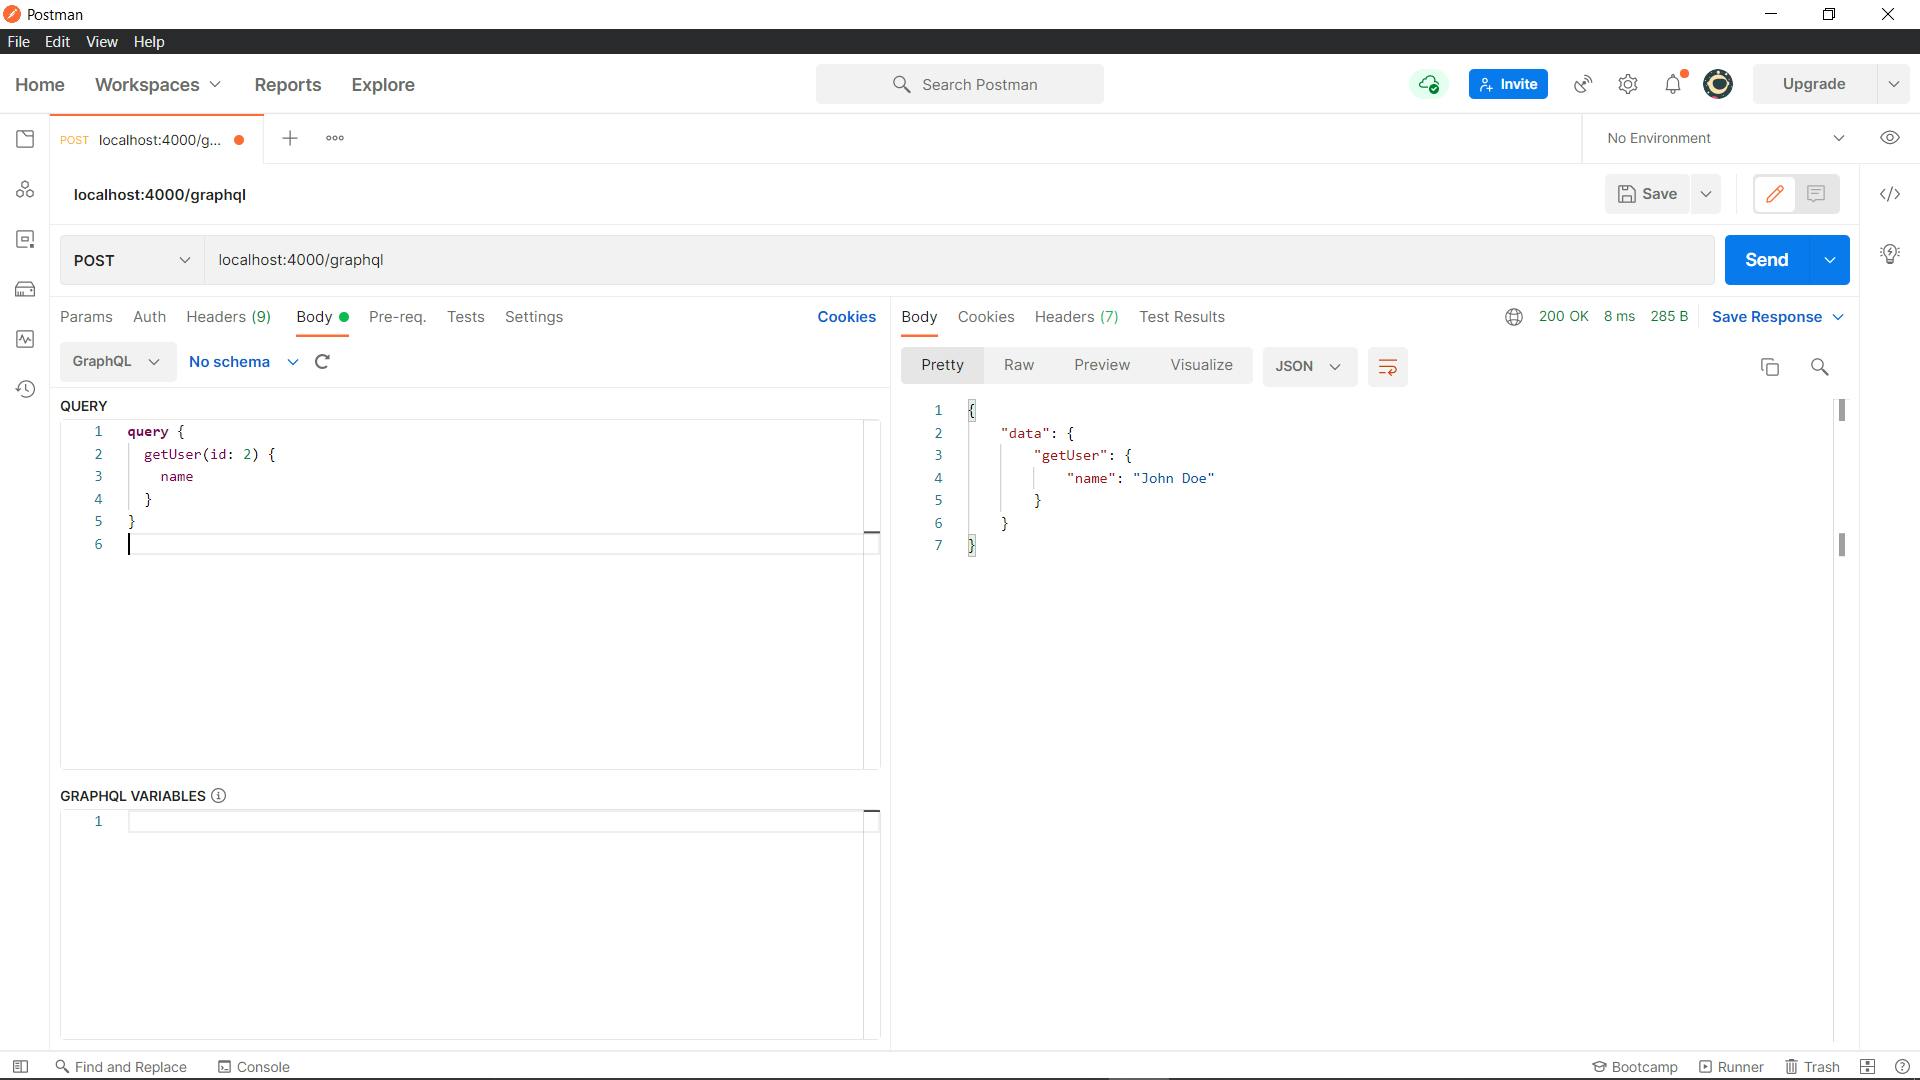
Let's see if this new resource was actually created by performing another query getUser to retrieve the second user
query {
  getUser(id: 2) {
    id, name
  }
}
it returns the data
{
    "data": {
        "getUser": {
            "id": "2",
            "name": "John Doe"
        }
    }
}

Another interesting thing about graphql when compared to REST is that you can retrieve only number of fields you need on each request sent to the server. For example you can decide that you want only the name of the user which can be done like so:
query {
  getUser(id: 2) {
    name
  }
}
With result:
{
    "data": {
        "getUser": {
            "name": "John Doe"
        }
    }
}
Conclusion
So far I hope this has helped you know how to setup a graphql server and get some good knowledge about it. There are many more things to learn about graphql but this is like the basics that can get you started.
Here are other articles to get you up in speed on GraphQl: